Tuesday, November 13, 2007

Linux Desktop Testing Project editor

A nice post by Hari, Thanks for your nice post.

Want to use LDTP to test your application? Or do you want to automate the actions you do often? Or are you a GNU/Linux user who want to show “magic” to your friends by recording your actions and playing them back? You can use LDTP for this. But one small issue with LDTP is that you should know the LDTP Python API to write any test suite. But with the new LDTP Editor, this makes your job really simple. A screenshot of the LDTP Editor is shown below.
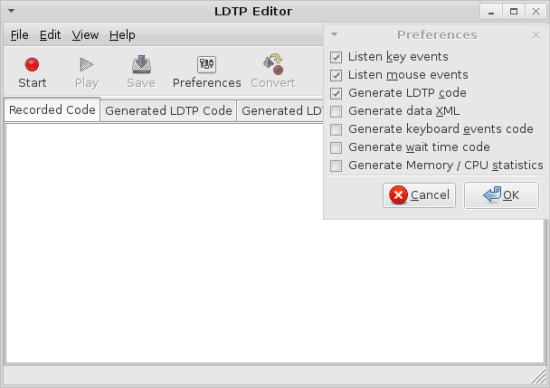
LDTP Editor

This is a simple HOWTO for recording and playing back the recorded script.

Installing LDTP.

  • Download the lastest LDTP source code from http://people.freedesktop.org/~nagappan/ldtp-0.9.2.tar.gz.
  • Uncompress the file.
  • Compile the code using ./configure and make
  • If you don’t have the access to install softwares, run the ldtpeditor file in the python folder
  • If you have access to install softwares, then run “make install”

Note:: After installing LDTP Editor, i when i tried to run ldtpeditor, got an error saying

hari@hari-laptop:~/ldtp/ldtp-0.9.2$ ldtpeditor
(ldtpeditor:11130): libglade-WARNING **: could not find glade file '/usr/share/local/ldtp/glade/ldtpeditor.glade'
Glade file not found

The ldtpeditor.glade file is present in the python folder. I got this error because i compiled the code as ./configure. If i had done it as ‘./configure –prefix=/usr’, then i wouldn’t have got this error. Anyway i copied the file manually to that folder.

hari@hari-laptop:~/ldtp/ldtp-0.9.2$ sudo mkdir -p /usr/share/local/ldtp/glade/
hari@hari-laptop:~/ldtp/ldtp-0.9.2$ sudo cp python/ldtpeditor.glade /usr/share/local/ldtp/glade/
hari@hari-laptop:~/ldtp/ldtp-0.9.2$ ldtpeditor

After that when i ran ldtpeditor, it ran without any issues.

Recording using LDTP Editor

For this let us consider recording the actions performed in gcalctool.

  • First make sure Assistive Technology is enabled in your desktop. If you are not sure about this, open gnome-control-center and in that open Assistive Technology Preferences. You should have Enable Assistive Technologies checked to use LDTP.
  • If you are enabling Assistive Technology only now, logout and login again.
  • Run ldtpeditor and gcalctool.
  • Make sure both you have enabled ‘Always on Top’ or both the applications and both the window doesn’t overlap with each other.
  • Click the Start button the LDTP Editor. All actions performed after this are recorded.
  • Perform actions in the gcalctool. Check out this video to see the actions i recored in my computer .
  • After you’re done with the actions in the gcalctool, click the Stop button in the LDTP Editor.
  • You can see that the ‘Recorded Code’ tab is updated with code as when you perform actions in gcalctool.
  • Click the convert button in the LDTP Editor. You’ll see that the Generated LDTP Code and Generated LDTP XML tabs are filled with generated code.
  • The Play button is not working now. I wrote the patch for that yesterday night ;-).
  • Save the contents of the ‘Generated LDTP Code’ into a python file (for ex frisco.py) . Note that if the file name you specify already exists, then it OVERWRITES the filename without any warning.
  • Then run hari@hari-laptop:~$ python frisco.py
  • The actions you performed while recording will be played back again :-)

Currently the Play button in the LDTP Editor is not enabled. But you can make it work by applying the patch mentioned below. I guess this patch will be added to LDTP Editor in a week or so. So check the ChangeLog file before applying the patch.

LDTP Editor Preferences

Using the LDTP Prefereces, you can control what all actions you can control. A brief summary about the options given in the Preferences window.

  • Listen key events
    This option is not yet implemented. Checking/Unchecking this doesn’t make any difference now.
  • Listen mouse events
    This option is not yet implemented. Checking/Unchecking this doesn’t make any difference now.
  • Generate LDTP Code
    Only when if this option is enabled, Convert will generated to LDTP code in the ‘Generated LDTP Code’ tab. This is enabled by default when you run LDTP Editor.
  • Generate Data XML
    If this option is enabled, the LDTP Editor will generate data XML for the actions you perform.
  • Generate keyboard events code
    Generates code for the keyboard events you performed during the recording session.
  • Generate wait time code
    Calculates the delay one takes between each action during the recording session and generates code so that similar time delay is generated while play back.
  • Generate Memory / CPU statistics.
    The code to generate Memory and CPU statistics will be generated. You need to install pystatgrab and libstatgrab packages.

Patching to make the Run button work

  • Copy this patch file to your ldtp folder.
  • Runhari@hari-laptop:~/ldtp/ldtp-0.9.2$ cd ldtp-0.9.2
    hari@hari-laptop:~/ldtp/ldtp-0.9.2$ patch -p0 <>
  • Compile the code again and run ldtpeditor. This time after you Convert the Code, you can Run the code from the LDTP Editor. :-)

Note:: The generated code had many unwanted waittillguiexist. I saw waittillguiexist(”dlg0″) in many places. If your playback is stopped because of this, remove that before running the scripts.
Sometime the resource will go high as the application map info is collected from the application, so no need to worry.

If you find any issues regarding LDTP Editor, report it to ldtp-dev@lists.freedesktop.org or nagappan@gmail.com or sp2hari@gmail.com

All patches are welcome. :-)

My comments:

You can use ./configure --prefix=/usr to avoid that glade file missing warning.

Additional notes:

* After clicking record click 'Convert' to get the code converted in LDTP format (It does some post processing, so its required)
* Click save button to save generated python script, if 2nd tab is empty, then it will try to get the contents of first tab and store it in the file you specify. If file already exist, it will *OVER-WRITE*
* control+c, control+v doesn't work
* Sometime the resource will go high as the application map info is collected from the application, so no need to worry. With Thunderbird, the recording really sucks
* You need to have GNOME 2.14 and above to use LDTP editor

Tuesday, October 2, 2007

Random updates

* Moved from emacs to MonoDevelop for my Mono development ! I started liking it very much, few random crashes happen, when accessibility is enabled in GTK layer. I should log a bug on them (soon).
* LDTP packages are now available for Debian, Ubuntu apart from OpenSuSE, Fedora, Mandriva. Thanks to Karik Mistry :)
* Under Mono System.Data API compatibility is 97% in 2.0 profile, now targeting 99% within this month end. Me and Varadhan will be working on this target.
* Updated the work system from OpenSUSE 10.2 to 10.3, Its awesome !!!
* Canceled the flat that booked in Bangalore.
* Dobey's a11y-test-suite rpm are available for download here. A sample output of gedit available for 2.16 and for 2.20. You can use this to test any GNOME / Mozilla application.

Tuesday, August 28, 2007

Linux Desktop Testing Project (LDTP) 0.9.0 released

Whats new in this release...

* Kartik Mistry fixed build issue in Alpha machines
* Rewrite of LDTP recording framework and now it completely uses pyatspi or orca-atspi (when pyatspi is not installed) - Thanks to Willi Walker of Sun - Supporting LDTP community to use orca's atspi.
* Added new accessibility roles required for Firefox automation
* LDTP documentation has been majorly updated
* Other major bug fixes

Download source tarball / Binary rpm

Thanks to
* Mozilla organization for selecting LDTP for Google Summer of Code 2007
* Sun China team (Emily Chen, Dave Lin, and others) for their support through out SOC'07
* Harishankaran - Student participated in LDTP - Mozilla / Google SoC

Summer of Code 2007 - Firefox automation

Harishankaran (sp2hari) has done a wonderful job, Firefox automation using LDTP as part of Google Summer of Code 2007 under Mozilla organization.

Few interesting blogs by the student
* Firefox 3.0 amazing experience
* Tinderbox integration (Credit goes to Emily Chen, Dave Lin - Sun China team)
* SOC status
* Screen cast of FF 3.0 automation

A big thanks to Emily Chen, Dave Lin, Michael Shang of Sun China team ! Without their support its going to be a miracle for the student to integrate Firefox automation in Solaris Tinderbox setup.

You can download the FF 3.0 automation scripts from here

Sunday, August 26, 2007

Recording your screen in solaris :)

Posted by Harishankaran (sp2hari)

Recording your screen in Solaris works right out of the box. All you need to install is vncserver and vnc2swf.

A simple HOW TO about recording your screen in Solaris. :)

First you need to install Vncserver. Solaris by default doesn't come with a VNC. The easiest way to install VNC is through pkg-get

root@home# pkg-get -i vncserver

Before running that command, configure your pkg-get to get the packages from blastwave.org. Check http://www.blastwave.org/howto.html to get more details about setting up the repo.
That should install vncserver. :)

Next step it to install vnc2swf.
Download the C version of vnc2swf from http://www.unixuser.org/%7Eeuske/vnc2swf/index.html.
Extract the tar ball

hari@home:~$cd vnc2swf
hari@home:~$./configure
hari@home:~$make
root@home#make install

The commands mentioned above will install vnc2swf . :)

All you need to do to use vnc2swf is to start a vncserver. vnc2swf just needs the output file name to be passed as command line argument when started. Pressing F8 gives the options to start, stop, pause and clear the reocrding.

Some of the issues i faced are :)

1. When the same user tries to start a gnome-session in the vnc, an error message saying gnome-session is already running is given. So the best bet is to create a new user and start the vncserver of that user.

2. The icons are not displayed properly if you login into the new user's account using GNOME. Use Common Desktop Environment (CDE) to login and start a vncserver.

3. By default, the new user won't have a .vnc folder. So start a vnc and kill that. Now you will have .vnc folder with a xstartup file. Modify the file so that gnome-session runs in the vnc instead of the default twm. The xstartup file should look like

#!/bin/sh

/usr/openwin/bin/xrdb $HOME/.Xresources
/usr/openwin/bin/xsetroot -solid grey
/usr/openwin/bin/xterm -geometry 80x24+10+10 -ls -title "$VNCDESKTOP Desktop" &
#/usr/openwin/bin/twm &
gnome-session &


And yeah, what i recorded can be viewed at http://download.freedesktop.org/ldtp/movies/screen2.html. Nice right ;-)

My Tinderbox is working...

Posted by Harishankaran (sp2hari)

Yes, you heard it right. My tinderbox is working. Even now i don't know why i was trying to setup a tinderbox after both Emily and Nags asked me to concentrate on Firefox automation. I felt it was almost done and just few more steps, i will be able to set it up. And that's what finally happened :)

So in this post, i am going to mention about all issues i faced in setting up a tinderbox and steps to fix them.

Note :: If you are ever setting up a tinderbox, be prepared to see huge log files. Like once my compilation ran for few hours and produced a log file of size 15MB. And if you are stuck up, DON'T send the entire file. A tail of that file should do. In fact, you should be in a position to find out from while line the exact error starts.

Yeah before you start reading this
http://sp2hari.blogspot.com/2007/06/conquered-solaris.html and
http://sp2hari.blogspot.com/2007/06/tinderbox.html has instructions about how to setup Tinderbox in Solaris environment.

Ok the first error i got was

Building deps for jsinterp.c
cc -o jsinterp.o -c -DOSTYPE=\"SunOS5\" -DOSARCH=SunOS -DEXPORT_JS_API -DJS_USE_SAFE_ARENA -I../../dist/include -I../../dist/include/js -I../../dist/include/nspr -DMOZ_PNG_READ -DMOZ_PNG_WRITE -I../../dist/sdk/include -I. -KPIC -xlibmil -xstrconst -xbuiltin=%all -mt -DNDEBUG -DTRIMMED -xO4 -DMOZILLA_VERSION=\"1.9a7pre\" -DMOZILLA_VERSION_U=1.9a7pre -DSOLARIS=1 -DNSCAP_DISABLE_DEBUG_PTR_TYPES=1 -DD_INO=d_ino -DSTDC_HEADERS=1 -DHAVE_ST_BLKSIZE=1 -DHAVE_SIGINFO_T=1 -DHAVE_INT16_T=1 -DHAVE_INT32_T=1 -DHAVE_INT64_T=1 -DHAVE_UINT=1 -DHAVE_UINT_T=1 -DHAVE_UINT16_T=1 -DHAVE_DIRENT_H=1 -DHAVE_SYS_BYTEORDER_H=1 -DHAVE_GETOPT_H=1 -DHAVE_MEMORY_H=1 -DHAVE_UNISTD_H=1 -DHAVE_NL_TYPES_H=1 -DHAVE_MALLOC_H=1 -DHAVE_X11_XKBLIB_H=1 -DHAVE_SYS_STATVFS_H=1 -DHAVE_SYS_STATFS_H=1 -DHAVE_LIBM=1 -DHAVE_LIBDL=1 -DHAVE_LIBSOCKET=1 -DFUNCPROTO=15 -DHAVE_XSHM=1 -D_REENTRANT=1 -DHAVE_RANDOM=1 -DHAVE_STRERROR=1 -DHAVE_LCHOWN=1 -DHAVE_FCHMOD=1 -DHAVE_SNPRINTF=1 -DHAVE_MEMMOVE=1 -DHAVE_RINT=1 -DHAVE_STAT64=1 -DHAVE_LSTAT64=1 -DHAVE_FLOCKFILE=1 -DHAVE_LOCALTIME_R=1 -DHAVE_STRTOK_R=1 -DHAVE_LANGINFO_CODESET=1 -DVA_COPY=va_copy -DHAVE_VA_COPY=1 -DHAVE_I18N_LC_MESSAGES=1 -DMOZ_EMBEDDING_LEVEL_DEFAULT=1 -DMOZ_EMBEDDING_LEVEL_BASIC=1 -DMOZ_EMBEDDING_LEVEL_MINIMAL=1 -DMOZ_PHOENIX=1 -DMOZ_BUILD_APP=browser -DMOZ_XUL_APP=1 -DMOZ_DEFAULT_TOOLKIT=\"cairo-gtk2\" -DMOZ_WIDGET_GTK2=1 -DMOZ_ENABLE_XREMOTE=1 -DMOZ_THEBES=1 -DMOZ_CAIRO_GFX=1 -DMOZ_X11=1 -DMOZ_DISTRIBUTION_ID=\"org.mozilla\" -DMOZ_ENABLE_XFT=1 -DMOZ_ENABLE_PANGO=1 -DMOZ_ENABLE_COREXFONTS=1 -DMOZ_ENABLE_GNOMEUI=1 -DMOZ_EXTRA_X11CONVERTERS=1 -DOJI=1 -DIBMBIDI=1 -DMOZ_VIEW_SOURCE=1 -DACCESSIBILITY=1 -DMOZ_XPINSTALL=1 -DMOZ_JSLOADER=1 -DNS_PRINTING=1 -DNS_PRINT_PREVIEW=1 -DMOZ_NO_XPCOM_OBSOLETE=1 -DMOZ_XTF=1 -DMOZ_MATHML=1 -DMOZ_ENABLE_CANVAS=1 -DMOZ_SVG=1 -DMOZ_SVG_FOREIGNOBJECT=1 -DMOZ_UPDATE_CHANNEL=default -DMOZ_PLACES=1 -DMOZ_PLACES_BOOKMARKS=1 -DMOZ_FEEDS=1 -DMOZ_STORAGE=1 -DMOZ_SAFE_BROWSING=1 -DMOZ_URL_CLASSIFIER=1 -DMOZ_LOGGING=1 -DMOZ_USER_DIR=\".mozilla\" -DMOZ_ENABLE_LIBXUL=1 -DHAVE_STDINT_H=1 -DHAVE_INTTYPES_H=1 -DHAVE_SYS_INT_TYPES_H=1 -DHAVE_UINT64_T=1 -DMOZ_XUL=1 -DMOZ_PROFILELOCKING=1 -DMOZ_RDF=1 -DMOZ_MORKREADER=1 -DMOZ_DLL_SUFFIX=\".so\" -DXP_UNIX=1 -DUNIX_ASYNC_DNS=1 -DJS_THREADSAFE=1 -DMOZ_ACCESSIBILITY_ATK=1 -DATK_MAJOR_VERSION=1 -DATK_MINOR_VERSION=12 -DATK_REV_VERSION=3 -DMOZILLA_LOCALE_VERSION=\"1.9a1\" -DMOZILLA_REGION_VERSION=\"1.9a1\" -DMOZILLA_SKIN_VERSION=\"1.8\" -D_MOZILLA_CONFIG_H_ -DMOZILLA_CLIENT jsinterp.c
ube: error: Assert has been violated at '/set/venus/builds.intel-S2/nightly.Thu/intel-S2/lang/ube/graphs/src/scregion.c 305'.
cc: ube failed for jsinterp.c
gmake[4]: *** [jsinterp.o] Error 2

Dave from Sun china asked me use a patch for Sun Studio 11 Compiler C. I don't have the link to the patch now but the patch id is 121016-05. I remember getting it from the sun website. So searching there should give you the link. The above patch was dependent on patch 120759-06. So installed patch 120759-06 first and then install the patch 121016-05.

Steps to add a patch in Solaris are given below. The commands are for patch 121016-05. Change the id according to the patch you are installing.

1. Download 121016-05.zip and extract the contents in your current directory
2. Login as root
3. root@home# patchadd 121016-05
Note :: If the above command doesn't work, then try
root@home# patchadd . 121016-05


The above steps should install the patch in your system. To check whether the patch is installed properly, check the folder /var/sadm/patch/. You should see seperate directories for each patch you have installed. In my system here, the /var/sdm/patch is like
# cd /var/sadm/patch/
# ls
120759-06 121016-05

That fixed the above problem :).

The next error i got was

jsinterp.c
ir2hf: error: Ran out of memory
cc: ir2hf failed for jsinterp.c

Now this is a strange problem and which can be fixed without much issue. You need more RAM. My system had 768MB (512+256) RAM, but you need 1GB RAM to fix this issue. So next day i got 1GB RAM and never got this error back.

After that, i got many compilation errors. This happened because of some issue in the mozilla code. This generally never happens. I got errors in lines having inline. Anyway now i am not getting the error anymore. So i think the mozilla code is fixed now. :)

Finally i got an error saying,

gmake[3]: Leaving directory `/export/home/hari/tinderbox
/SunOS_5.11_Depend/mozilla'
gmake[2]: Leaving directory `/export/home/hari/tinderbox/SunOS_5.11_Depend/mozilla'
make[1]: Leaving directory `/export/home/hari/tinderbox/SunOS_5.11_Depend/mozilla'
firefox-bin built successfully.
firefox-bin binary exists, build successful.
Unable to find path to Talkback client. Proceeding as if Talkback was not installed.


Running regxpcom test ...
Timeout = 120 seconds.
Begin: Fri Aug 24 08:08:37 2007
cmd = /export/home/hari/tinderbox/SunOS_5.11_Depend/mozilla//dist/bin/firefox-bin -register
End: Fri Aug 24 08:08:38 2007
----------- Output from regxpcom -------------
----------- End Output from regxpcom ---------
regxpcom: test failed
No profile found, creating profile.
Begin: Fri Aug 24 08:08:38 2007
cmd = /export/home/hari/tinderbox/SunOS_5.11_Depend/mozilla//dist/bin/firefox-bin -CreateProfile default
End: Fri Aug 24 08:08:39 2007
----------- Output from Profile Creation -------------
Xlib: connection to ":0.0" refused by server
Xlib: No protocol specified


(firefox-bin:6432): Gtk-WARNING **: cannot open display:
----------- End Output from Profile Creation ---------
ERROR: profile /export/home/hari/tinderbox/SunOS_5.11_Depend/.mozilla/firefox/ does not exist
no pref file found

The solution for the above bug was to allow connections to X server. This is done by executing the following command before starting a tinderbox compilation. Remember the user who is running the tinderbox should execute the command.

hari@home:~$/usr/openwin/bin/xhost +
access control disabled, clients can connect from any host

Few other things to note while trying to compile firefox under tinderbox are
1. Never ever run two instances of tinderbox at the same time. Make sure the first one is killed before starting a new one.
2. Delete the SunOS_5.11_Depend folder when you are facing any compilation errors.
3. Use -XO3 for CFLAGS and CXXFLAGS
4. Make sure your mozconfig file has these lines
ac_add_options --disable-freetype2
ac_add_options --disable-debug
ac_add_options --disable-tests

SOC ...

Posted by Harishankaran (sp2hari)

Updates about SOC.
30 test scripts are working fine without any issue :). My target is to write 50 test cases and i will try to reach that this weekend :) :).

The scripts can be downloaded from here.

Things to be modified when you run your script in your environment are.
1. In the file firefox.xml, change the value of <filepath> for so that it points the file called index.html in the folder called data in your scripts directory.

Let me give a detailed HOW TO for running these scripts.

1. First, LDTP must be installed in your system.
The CVS page in ldtp.freedesktop.org provides the instructions for getting the LDTP code through CVS.

Note : I had a small issue compiling the code which i got from CVS.
While using ./configure it gave me an error saying

./configure: line 3998: syntax error near unexpected token `LIBXML2,'
./configure: line 3998: `PKG_CHECK_MODULES(LIBXML2, libxml-2.0 >= 2.0.0)'

The above error is because autoconf and pkg-conf are installed at two different locations. For more details check http://lists.freedesktop.org/pipermail/xserver/2003-December/000573.html

So i used this package which compiled without any issue :).
For more details on how to install, check here.

2. Enable Accessibility from gnome-control-center

3. Download and start Firefox3.0a*pre from here ( Any FF3.0 alpha release should work, though with FF3.0a8pre, it is tested throughly.
Note :: When you start firefox, make sure you don't have any other instance of firefox running.

4.Run the command

hari@home:~/soc/tinderbox$ ldtprunner run.xml


If you have set LDTP_DEBUG=1 in your shell, then it will show lots of output. Don't get scared. It only means things are working fine :)
Note :: You can also work with LDTP_DEBUG unset, if you want a "clean" output.

Once that command is executed, then it will run the test cases provided in the run.xml.

A file called log.xml gives the details about the test cases run. The last three lines in the log file should be like this if the test case ran properly for all the 30 test cases provided.

<groupsstatus total="30" pass="30" fail="0"/>
</group>
</ldtp>

The screen record video on Solaris 11 is given can be viewed from here.
http://download.freedesktop.org/ldtp/movies/screen2.html

The current status of the test cases can be viewed from here.
http://ldtp.freedesktop.org/wiki/Firefox_Test_Cases